Halloween 2015 Trick or Treaters Part 2: GUI Design
In Part 1 of Halloween 2015 Trick or Treaters, I discussed my thought process when designing the database. Since I knew there wouldn’t be much time between trick or treaters, I knew I would need a GUI (graphical user interface) to quickly enter my data. My strongest programming language is Python, but I find its GUI tools lacking. I’ve been teaching myself Visual Basic a little over the last year or so and thought this would be a great opportunity to get some more practice in. Installing Visual Studio Visual Studio 2015 is a great tool. You can use it for much more than just Visual Basic (it even has a Python IDE built in which I’m eager to explore). Click here to download the community edition of Visual Studio. Next, we will need to install MySQL for Visual Studio so that we can connect our GUI to our MySQL database. Open up the MySQL installer (I describe this in the post here) and click ‘Add…’ on the right side. Search ‘visual’ to find MySQL for Visual Studio and install it. GUI Design I have found that it is best to draw out what you want your GUI to look like before you start to build it. I try to think about efficiency, making buttons that I will use often larger or in an obvious area. I also think about the type of input fields I want: drop down, textbox, checkbox, etc. *Note: *I highly recommend adding two temporary textboxes to every GUI you build. One is to type MySQL commands directly to the database and the other is for responses from the database and/or errors you receive from the GUI. Just remember to remove them when you are finished with them! The final GUI layout that I ended up with looks like this: 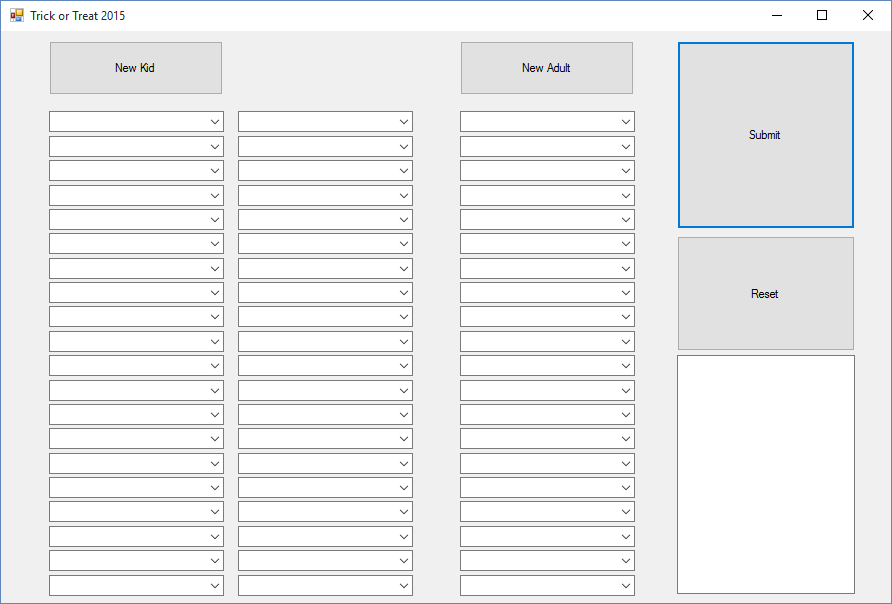 Final GUI layout The very first column contains a dropdown of kid costumes that have already come to my house. When possible, you always want to make sure you can’t accidentally enter a typo into your database. Because of this, I try to use dropdown menus where possible. The middle column is the corresponding kid’s candy selection. This dropdown was easy because there were limited options of candy for the kids to choose from. Finally, the third column was for adult costumes (if any). All of these dropdown menus are populated from tables from the MySQL database. Nothing was hardcoded into Visual Studio. I knew I wouldn’t be able to predict which costumes would come to my house, so I needed a way to add new costumes to the database. The buttons ‘New Kid’ and ‘New Adult’ prompt a popup window that allowed me to enter new costumes to the appropriate database which in turn populated the appropriate dropdown. Connecting to MySQL Database with Visual Basic First, create the project in Visual Studio. Note where the project is being saved on your machine. In order to connect to MySQL, we will need to move the MySQL.Data.dll file that you obtained through the MySQL Installer when installing MySQL for Visual Studios to your project location. The default MySQL.Data.dll location is C:\Program Files (x86)\MySQL\MySQL Installer for Windows. Copy this file to yourproject/bin/Debug folder. Next, we need to import the MySQL client into our .vb file. The default name for your main file in Visual Basic is Form1.vb. At the top of this file, type
Imports MySql.Data.MySqlClient
If you successfully copied the .dll file to your project’s directory, you shouldn’t receive any errors for this import command. Next, within the Form1 class, I like to set several global variables:
Dim conn As New MySqlConnection
Dim cmd As New MySqlCommand
Dim da As New MySqlDataAdapter
Dim constr As String = “database=[your_database_name]; data source = localhost; user id = [your_user_id]; password = [your_password];”
Obviously this is not extraordinarily secure since your password is in plain text. However, the risks if our password was hacked is pretty low. Next, in the Form1_Load private sub, we attempt to connect to the database by using
Try
conn.ConnectionString = constr
conn.Open()
Catch ex As MySqlException
MsgBox(ex.Message)
End Try
I made a public sub called mysqlsubmit which takes in the table name, columns, and values all as strings and submits the queries to the database. That function looks like:
Public Sub mysqlsubmit(table As String, cols As String, val As String)
Dim cs As String = “Database=halloween;Data Source=localhost;” _
“User Id=vb;Password=*****
Dim stm As String = “INSERT INTO “ + table + “ (“ + cols + “) VALUES (“ + val + “);”
Try
conn = New MySqlConnection(cs)
conn.Open()
Dim cmd As MySqlCommand = New MySqlCommand(stm, conn)
cmd.ExecuteScalar()
Catch ex As MySqlException
Finally
conn.Close()
End Try
End Sub
To submit a new costume to the kcostume table, I could use the above function:
mysqlsubmit(“kcostume”, “kcostume_id, kcostume_name”, “null, ‘“ + newcostume + “‘“)
Next time I do a Visual Basic GUI with a MySQL database, I think I will make a function that just takes the entire input string and sends it to MySQL. It will be easier to build the string than the above example. That is pretty much it! There is more to the code than what I have shown here but the majority of it repeats what we have discussed here. If interested, I can make the full code available.